Heat Transfer Using Circular References
The first time I used circular references in a way that was not an error was around 1998 as a mechanical engineering student. We used the iterative calculation feature in Excel to solve a basic 2D heat transfer problem using finite difference.
I've returned to this example mainly because it's a neat application of the use of circular references to solve iterative problems. Conditional formatting has come a long way since 1998, and that is what makes this simulation so interesting to watch.
Important Disclaimer: I don't claim to remember or understand all the physics involved with this type of heat transfer model (not my main area of study). So, make sure to consult references and only use this template to see how the approach has been implemented with Excel.
Heat Transfer Example
in Excel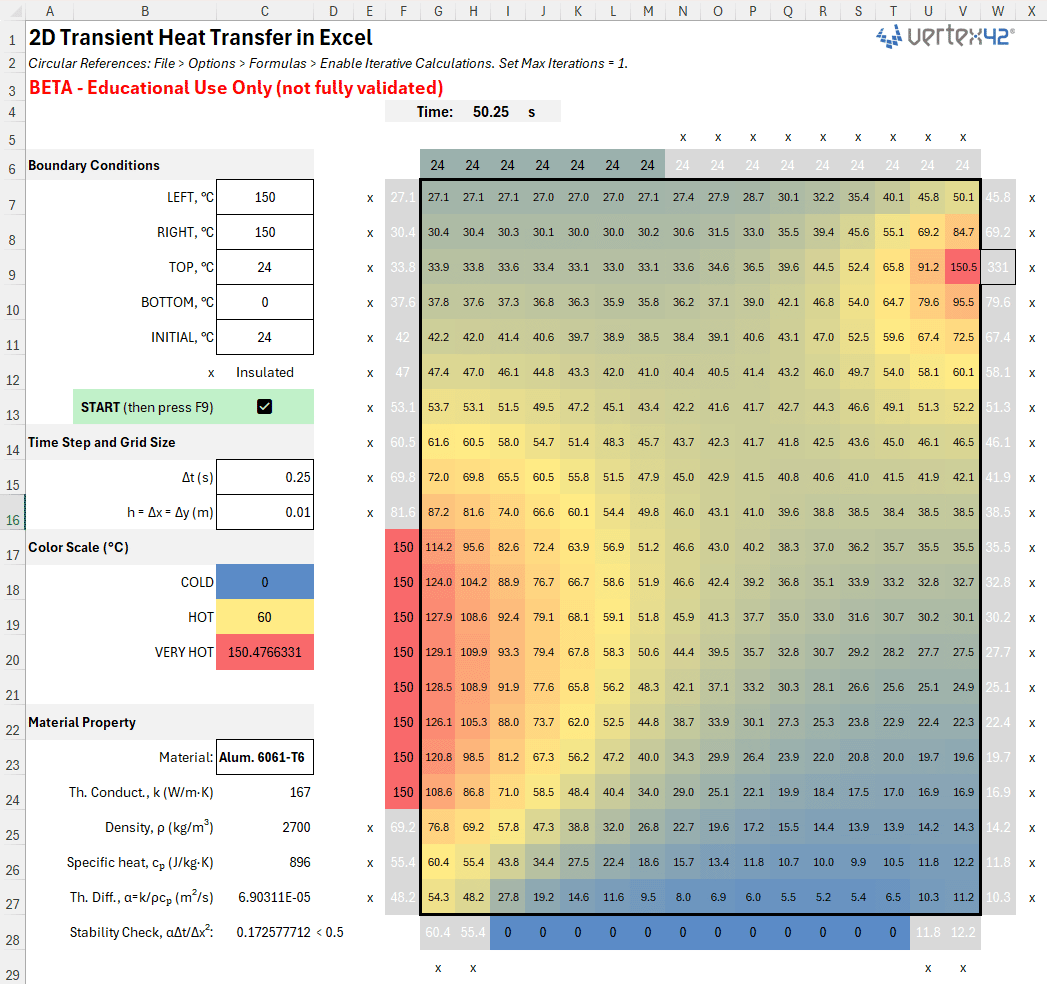
Description
This Excel file is mainly for educational purposes - for demonstrating the use of circular references to solve an interesting type of problem. It is not meant to guarantee any particular accuracy! Accuracy of the simulation is left up to the user to learn about and figure out.
Boundary Conditions
The boundary conditions for the heat transfer problem are purposefully simplistic - it assumes just a basic constant-temperature condition on the edges.
- Dirichlet (fixed tempature). The easiest BC to model because the BC is just the temperature.
- Neumann (prescribed heat flux). When heat flux q''=0, it represents an insulated condition. This template uses the Ghost Node technique, where the Ghost Node is a mirror of the internal node. A prescribed heat flux could represent a torch or other power-based heating, and the temperature change from this external source is added to the Ghost Node.
- Robin/Convective. This template does not include the convective option.
Why a ghost node?
The 5-point stencil uses a centered derivative/second derivative. At a boundary node you are missing the "outside" neighbor. The ghost value stands in for that missing neighbor so you can keep the same centered stencil.
For a Neumann BC (prescribed flux), you pick the ghost so that the normal gradient matches the prescribed flux.
Using the ghost in the centered stencil at the boundary node is algebraically equivalent to updating a half-mass CV with the correct boundary flux. That's why the boundary update has produces about twice the ΔT per step at the boundary vs. an interior source of equal power: same input power, half the thermal mass.
Steady-State vs. Transient Model Updates
The transient model uses explicit time stepping, with a Jacobi-style iteration (use old values, then replace), where Tnext is calculated from Told and then the entire Tnext array replaces the Told array to begin the next iteration.
The steady-state model uses Gauss-Seidel (or in-place) updates, which write each value immediately and then use some newly updated neighbors within the same sweep (asynchronous/serial update). Excel sweeps left-to-right, top-to-bottom.
References and Resources
The equations I used for this model came from an old set of notes I used in my kinematics class from BYU. See my kinematics page for some of my oldest Excel stuff on my website.


