Time Tracking Template
You can find all kinds of time tracking software on the internet for businesses of all sizes. Some time tracking solutions make it simple to clock in and out and track hours worked on specific projects, whether that's through the use of mobile apps or time clock machines or web-based timesheets. Our time tracking solution provides a way to track your work on specific projects using a simple spreadsheet.
To track hours worked on projects rather than logging the actual times worked, you can try the weekly timecard template. There is also a hidden column in this template that lets you record minutes worked rather than entering start/end times.
Time Tracking Template
for ExcelLicense: Private Use (not for distribution or resale)
"No installation, no macros - just a simple spreadsheet"
Description
This Time Tracking Template is designed for freelancers, lawyers, engineers, sub-contractors, and other professionals who have multiple clients or need to track time worked on multiple projects and tasks. It can be used as an employee time tracker as well, but certain features like tracking hours billed and invoices may not be required.
The time tracking template takes advantage of many special features in Excel, such as pivot tables, slicers, and drop-down lists. These features may require a more advanced knowledge of Excel to set up, but that part has already been done for you. Just follow the few simple instructions in the worksheet to get started using the time tracker.
Using the Time Tracking Template
Using the Time Tracking Log
The screenshot above shows the TimeLog worksheet, where you record hours worked by entering the date, project, task, start time and end time. If you took breaks that should not be included in billable hours, you can enter the time in minutes.
Projects and Tasks: The Project ID and Task ID columns use Data Validation to create drop-down lists that let you select from the current active set of projects. The Task ID list is dependent on the Project ID, so the items in the drop-down list will change based upon the Project ID that you choose.
Monitor Hours Worked: The top of the worksheet summarizes total hours worked for the current day, the current week, and a custom time period that you can change by entering the start and end dates.
Marking Hours as Billed: The spreadsheet does not include an invoice, but you can download an invoice template to use along with this time tracker. After you bill for hours worked, update the time log by putting an "x" in the Billed column. You could enter another value such as "n/a" if you want to track work that is not billable.
Tracking Invoices: In addition to indicating whether hours have been billed, you may want to include the associated Invoice number. This would be mainly for record-keeping purposes. The invoice number is not used anywhere else in the template.
Adding more rows: The time tracking log table uses Excel's special Table feature, so you can add more rows to the bottom by just dragging the bottom corner of the table down. You can also insert rows in the table the traditional way. The cool thing about the Table feature is that the formulas in the Hours and Current Period are copied automatically when you insert or add new rows.
Recording minutes worked: If you want to be able to enter the number of minutes worked on a project in a given day rather than having to record start and end times, unhide column H and use the Minutes Worked column. This can be handy if you are only using the template for estimating time spent on various tasks instead of for billing or payroll purposes.
Customizing the Project and Task Lists
Customers and clients may come and go. Projects and tasks may change from time to time. We've made it very simple to update the projects and tasks that show up. Just edit the table in the Projects worksheet shown in the image below. Place an "x" in the Active column for all the project/tasks that you want to have show up in the drop-down lists.
Updating Pivot Tables: We've used a special Excel trick in our time tracker spreadsheet for creating dependent project/task lists. To the right of the Projects and Tasks table, you'll see two pivot tables that look like this:
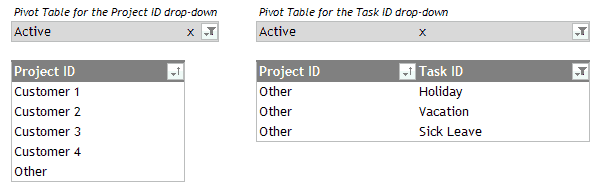
After editing and sorting the Projects and Tasks table, just update the pivot tables by pressing CTRL+ALT+F5 or going to Data > Refresh All.
Creating Reports from the Time Tracking Log
The Report worksheet uses a pivot table that makes creating various summary reports very easy (see the image below). The boxes with buttons to the right of the pivot table are called "Pivot Table Slicers" and allow you to quickly filter the "Current Period" and "Billed" columns by just clicking on the buttons. To remove a filter, you can click on the little filter icon in the upper right corner of the slicer.
To update the report, you can select a cell within the report then right-click and select Refresh, or go to Data > Refresh All > Refresh, or press ALT+F5. Using the slicers will automatically refresh the pivot table.
Summary of hours worked but not yet billed
To create invoices, you'll need to know how many hours were worked on various projects or for various customers. Set the Current Period to "(All)" and Billed to "(blank)".
Summary of hours worked over a specific period
If you are using the time tracker to report hours worked on specific projects over a specific period of time, then set Current Period to "yes" and Billed to "(All)".
Change the Start and End dates for the current period via the TimeLog worksheet. How it works: The Current Period column uses a formula to mark all entries that fall within that period as "yes". The pivot table allows you to filter on that column by selecting just the rows marked "yes".