Appointment Schedule Template
A spreadsheet can be a useful tool if you need a simple way to schedule appointments other than using online services or calendar software. You can print blank appointment schedule sheets or use Excel or Google Sheets for editing and tracking your appointment schedule electronically. I designed this template with that in mind and used conditional formatting to allow you to highlight appointments and mark whether they have been confirmed or not using a simple drop-down list.
Appointment Schedule Template
for Excel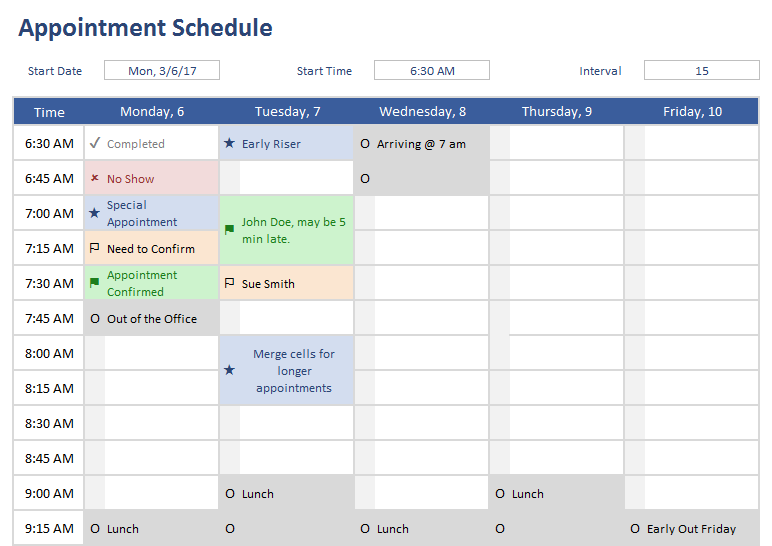
Download
⤓ Excel (.xlsx)License: Private Use (not for distribution or resale)
Authors: Jon Wittwer and Jim Wittwer
Description
This template was designed to help you schedule and follow up with appointments. Begin by choosing a start date and start time and a time interval (such as 15 minutes or 30 minutes). Then, make a copy of the Schedule worksheet before you begin creating your schedule. That way you will have a copy of the original schedule to use for other weeks.
Conditional formatting is used to automatically highlight the appointments based on the symbol or letter you choose from the drop-down list. See "How to Format Based on Another Cell."
Update 11/26/2021: We added extra columns (hidden by default) for showing six or seven days per week instead of just 5. Unhide these extra columns as needed.
Using Symbols to Mark or Flag Appointments
The column to the left of each appointment uses a data validation drop-down list with various symbols to automatically change the background and font colors.
★ - If you want to highlight special appointments, you can use this star symbol.
⚐ - Use this symbol to flag the appointments that you have not yet confirmed.
⚑ - After an appointment is confirmed, you can change change the flag to this symbol.
✔ - You can use the check mark to indicate that your client or patient showed up and the appointment is complete.
x - If the person does not show up for an appointment, you can mark it with an x.
O - The letter O is used to indicate when you are out of the office or taking a break.
The symbols are listed in the Legend to the right of the schedule and can be customized by changing the values within the legend. In theory, you could also add more symbols and conditional formats, but that would require more advanced Excel skills.
Tip: Make sure to customize the legend BEFORE you edit the schedule. Changing the legend will not change the values you may have already selected from the drop-down lists.
Note: Conditional Formatting will override manual changes to the font and background colors. So, if you would rather highlight everything on your own, you can either remove all the conditional formatting rules from the worksheet, or use the other blank schedule contained in the workbook.
Creating a Multi-Week Appointment Schedule
I didn't set up the file with worksheets for multiple weeks because the idea is for you to first customize the schedule the way you want it. THEN, you can duplicate the worksheet multiple times and rename the worksheet tabs for different weeks (e.g. Mar 6, Mar 13, Mar 20, etc.). In Excel, you can duplicate the worksheet by right-clicking on the tab and selecting Move or Copy.
Merge Cells for Longer Appointments
If you have an appointment that would overlap multiple cells in the worksheet, you can use the "Merge and Center" command (in the Home ribbon) to merge cells like the examples shown in the above screenshot. After you do that, you can change the text alignment back to left aligned if you want to.
If you un-merge cells, the data validation and conditional formatting may be erased from some of the merged cells, so you would need to copy/paste the formatting from the cell above to fix the un-merged cells.