Printable Daily Desktop Calendar
It's probably a lot easier to just buy a pre-made daily desktop calendar. But, if you want to customize your own calendar with quotes, special holidays, and events (like birthdays and anniversaries), you can use this template for Excel. This daily desktop calendar template is designed to be printed on 8 1/2 x 11 inch paper and then cut vertically and horizontally. After assembling the pages in the correct order, you can bind the top edge to create a flip-style calendar.
Daily Desktop Calendar
for Excel 2010+
Template Details
License: Private Use(not for distribution or resale)
Description
This spreadsheet was designed to help you print your own daily calendar with your own daily quotes. The cutting and binding is up to you to figure out, but I designed this so that the calendar could be spiral bound along the top edge. The template is set up to print 92 pages with 4 days on each page (cut down the middle and center). You can choose to print one-sided or two-sided.
Printing Two-Sided: If you select "Two-Sided" from the drop down list in the Calendar worksheet, the template automatically orders the pages so that half-way through the year you flip the calendar around to continue with the second part of the year. The image below shows the print settings to use when printing two-sided (note that the pages should flip on the short side).
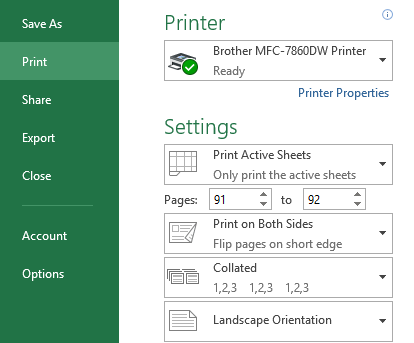
Settings for printing two-sided.
How to Create Your Own Daily Desktop Calendar
This will require some work, and you may need to be somewhat familiar with Excel so that you can fix print settings and other issues that may come up if you heavily customize the template. Here are some basic instructions:
Step 1: Make Sure It Works For You
Before spending a lot of time customizing the spreadsheet with quotes and custom events, make sure you understand how it works and that you are able to print the calendar. For example, you may want to try printing just the first 4 pages. Only continue using the template if you are able to do so without help from Vertex42.com.
Step 2: Add Quotes
In the Quotes worksheet, you can enter the reference and quote for each day of the year in the space provided. The quote does not shrink to fit within the allotted space, though, so if you have a very long quote, you may need to manually edit the font size for that day within the Calendar worksheet.
You can type your quotes and references directly into the Calendar worksheet if you want to do it that way. However, if you already have a list of quotes, it may be easier to copy/paste them into the Quotes worksheet.
Step 3: Customize Holidays and Events
Each day can show up to 3 holidays or events from the Holidays worksheet. You can delete the rows in the Holidays worksheet that you do not want to use. You can also add birthdays, anniversaries, and other events.
Step 4: Choose the Year
After creating your list of quotes and adding your own events, save a backup copy of the file, because steps 1 and 2 probably took you a LOT of time. If you used the Quotes and Holidays worksheets correctly, you should be able to reuse the spreadsheet in future years by just entering a new Year into the appropriate cell at the top right of the Calendar worksheet.
Step 5: Choose One-Sided or Two-Sided
If you print one-sided, you can tear off or throw away each day (depending on how you choose to bind the calendar). Printing one-sided requires twice as much paper, but may be a lot less confusing.
See the description above if you want to print Two-Sided.
Customizing the Look or Design
You can easily choose a different color scheme by going to Page Layout > Colors. You can choose a different theme font as well, but be careful not to choose a font that changes the row height.
The print settings have been pre-set to scale the print area to 92 pages, but if you make changes that affect the heights and widths of rows and columns, that can mess up the layout.
You can insert images from your computer if you want to make the calendar a little more interesting or if you want to add special images for special days of the year. In Excel, go to Insert > Pictures.

