Add a Customer List to Your Spreadsheet
This page explains how to create a Customer Drop-Down List in a spreadsheet and use Lookup formulas to automatically display customer information in other cells based on the value you have selected from the drop-down list. Instead of doing it all from scratch, you can download the Customer List template below which has a customer table and dynamic named ranges already defined to make the creation of the drop-down list and lookup formulas easier. Keep reading below the download area for instructions on how to set everything up.
If you are looking for a template to help you store and organize your general contact information, try our contact list template. This customer list worksheet is designed specifically for creating drop-down lists and lookups, not for general contact management.
Customer List Template
for Excel
License: Private Use (not for distribution or resale)
"No installation, no macros - just a simple spreadsheet" - by Jon Wittwer
Description
This template is mainly for intermediate spreadsheet users who are looking for a way to easily add customer lookup functionality to their spreadsheet(s). It is based on the technique used in our invoice tracking and invoice manager templates.
The Customers worksheet within this template is intended for use with other templates, such as invoices or work orders.
There are three named ranges defined in this spreadsheet that help make it easy to create drop-down boxes and lookup functions.
- CustomerList - This named range includes the entire customer list table (the header as well).
- CustomerName - This is a dynamic named range that is meant for use as the Source for a drop-down selection box.
- CustomerID - Another dynamic named range that could be used for the Source of a drop-down.
Tip: You can press F3 in Excel to view and select a named range in your workbook while entering a formula.
IMPORTANT: When using a customer list in an invoice spreadsheet, it would not be wise to send the actual spreadsheet to the customer (because it contains your list of customers). Instead, you would want to just print the invoice or create a PDF of the invoice worksheet.
Step 1. Copy the Customers Sheet into your Workbook
- Open both the customer list template AND the invoice or work order template that you are wanting to copy to.
- Right-click on the Customers tab and select "Move or Copy". Make sure to check the "Create a Copy" checkbox.
- Select the workbook you want to copy the sheet to, then press OK.
Step 2. Create a Drop-Down List for the Customer Name
After you have the worksheet copied into your spreadsheet, you can set up a drop-down box and lookup functions.
The image below shows a drop-down list that uses the Customer Name. It is a screenshot from the Invoice Tracking template. The instructions below explain how the drop-down box is created.
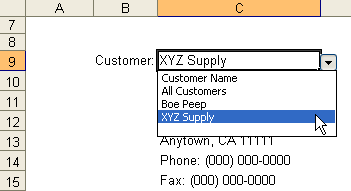
- Select cell C9 and go to Data > Validation to open the Data Validation dialog.
- In the Settings tab, choose List from the Allow field.
- In the Source field, enter =CustomerName
Step 3. Create Lookup Formulas
After you have selected a value from the customer list cell, you want other cells to display the related customer information. There are many ways to create lookup formulas. We will use the VLOOKUP method because the Customer Name is the first column in the Customers worksheet.
Our Spreadsheet Tips Workbook and article "VLOOKUP and INDEX-MATCH Examples" explain in detail how to create various types of lookup formulas, so if you want to use another method, such as INDEX-MATCH, see the article or the workbook.
Note that cell C14 in the example above shows the Phone number. The Phone number is in column 7 of the Customers sheet. Or more specifically, it is column 7 of the CustomerList range.
The formula for cell C14 could be:
The problem with the above formula is that if the value in the table is blank, the formula will display a zero. There are two ways around that. One approach is to use a custom number format like "#;#;;@" to display blank when the value is zero. The other way, and the way we do it in the invoice tracking template, is to handle the exception with an IF() formula, like this:
Related Templates
- Service Invoice with Customer List - This invoice template was one of the first templates we created that included a built-in customer list with drop-down selection and lookup functions.
- Invoice Tracker - This Customer List template is exactly what was used to create the invoice tracking template.
- Invoice Assistant - Our popular invoice manager spreadsheet uses these same techniques to automate the task of creating new invoices.
References:
- Spreadsheet Tips Workbook by vertex42.com - Provides detailed instructions on creating drop-down lists, dynamic named ranges, and creating lookup formulas.
- Create a Drop-Down List in Excel using Data Validation by vertex42.com
- Creating Dynamic Named Ranges by vertex42.com
